Mixing thermochromic powder into epoxy resin lets you build surfaces that visibly shift color in response to heat — a functional effect increasingly specified in craft art, interactive floor coatings, and novelty consumer goods. Done correctly, thermal pigment powder disperses into epoxy as a fine, uniform suspension that activates cleanly at a defined trigger temperature, with no streaking or dead zones. This article covers dispersion mechanics, ratio guidelines, activation thresholds, and the failure modes that compromise color-change performance in thermochromic pigment resin systems.
What You're Actually Working With
Thermochromic powders used in resin applications are microencapsulated leuco-dye systems. The active chemistry — typically a leuco dye, a developer, and a solvent — is sealed inside a polymer microcapsule, which is what you see as a fine powder. The capsule is the pigment. That distinction matters when you start mixing.
Unlike inorganic pigments, these microcapsules are mechanically fragile and chemically sensitive. The shell can be compromised by aggressive shear, reactive solvents, or sustained high-temperature cure cycles. Once the capsule wall is breached, the leuco dye system is exposed to the resin matrix and the color-change behavior is permanently lost. You won't get a warning — the cured piece simply won't activate.
Particle size for most thermochromic powders runs 1–10μm, fine enough to stay suspended during a normal epoxy pour if the viscosity is managed, but small enough that agglomeration is a real risk if the powder isn't pre-dispersed properly before it enters the resin.
Epoxy System Compatibility — What to Check First
Not all epoxy systems are suitable. Two variables make or break thermochromic compatibility before you add a single gram of powder:
Cure exotherm. Epoxy curing is exothermic. In thick pours, internal temperatures can spike well above 80–100°C. Most standard thermochromic pigments have an upper heat tolerance ceiling around 80°C (some formulations push to 120°C short-term). Exceed that during cure and you risk permanent deactivation — not just a temporary color shift, but irreversible degradation of the leuco dye system inside the capsule. Low-exotherm casting resins, or thin-layer pours with staged curing, are strongly preferred.
Resin pH and reactivity. Highly alkaline resin systems or amine-heavy hardeners can attack microcapsule shells over time, leading to gradual loss of activation response after curing. Standard bisphenol-A epoxy with aliphatic or cycloaliphatic amine hardeners is generally safe. UV-cure epoxy systems can also work, provided UV exposure time is controlled and doesn't generate excessive local heat.
Worth noting: BPA-free thermochromic series (such as Kolortek's food-grade KTP-xxF range) use a different encapsulation chemistry with slightly larger capsules (3–10μm). These tend to be marginally more robust in reactive resin systems, though the same exotherm cautions still apply.
Selecting the Right Thermochromic Powder for Epoxy
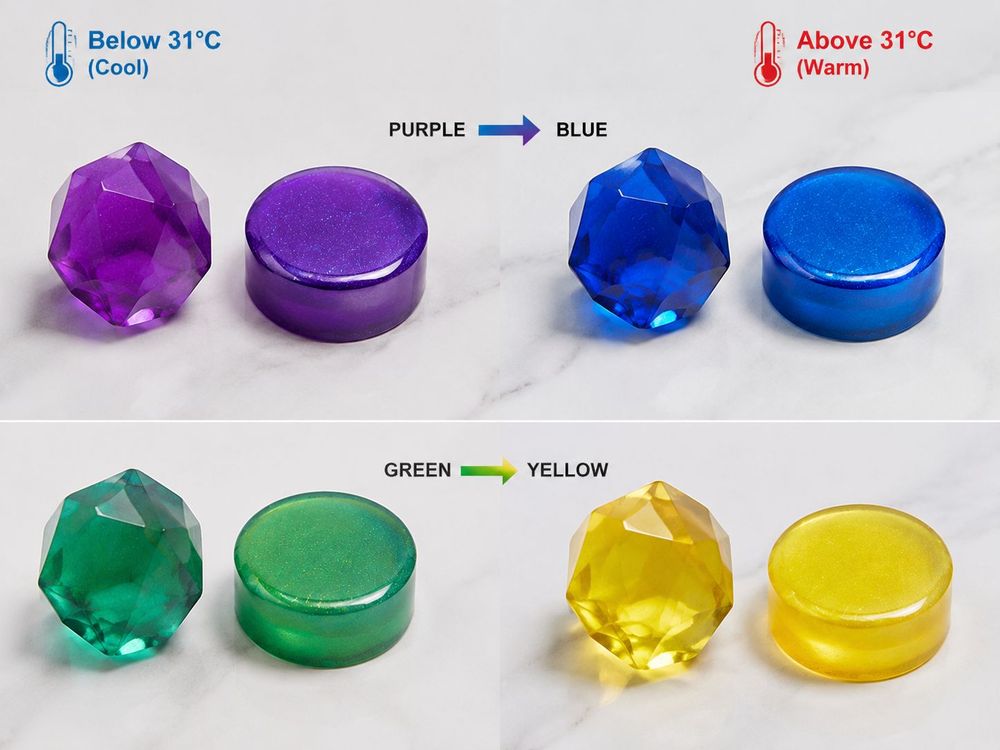
Activation temperature is the primary specification. Define what you need before ordering. Thermochromic powders fall into two behavioral categories:
| Type |
Behavior |
Example SKU |
Trigger Temp |
Typical Use |
| Colored → Colorless |
Full color at ambient; fades above trigger |
KTP-31-JB (Black → Colorless) |
31°C |
Reveal effects, decorative pours |
| Colored → Colorless |
Color below trigger; clears on contact with warmth |
KTP-32-MG (Green → Colorless) |
32°C |
Touch-activated surfaces |
| Colored → Another Color |
Distinct color shift; no transparency phase |
KTP-30-GY (Green → Yellow) |
31°C |
Temperature indicators, novelty pieces |
| Colored → Another Color |
Visible shift between two distinct hues |
KTP-30-BR (Black → Red) |
31°C |
Interactive decorative resin |
| Colored → Colorless (Low) |
Activates near ambient — responds to cool temps |
KTP-16-BR (Red → Colorless at 16°C) |
16°C |
Cold-responsive applications |
| Colored → Colorless (High) |
Stable color at ambient; shifts at elevated temp |
KTP-45-BR (Red → Colorless at 45°C) |
45°C |
Safety indicators, high-heat surfaces |
For touch-activated epoxy art — where a palm or fingertip triggers the change — 31–32°C is the practical sweet spot. It sits above average room temperature (avoiding false activations) while responding reliably to skin contact.
If the background color matters to the reveal effect, remember: colored-to-colorless types expose whatever is beneath the thermochromic layer. Plan your substrate or base layer color deliberately.
The Mixing Process — Step by Step
The sequence matters. Thermochromic powder should never be dropped directly into a mixed epoxy batch and stirred aggressively. That approach causes agglomeration and capsule damage simultaneously.
Step 1 — Pre-disperse the powder. Weigh out the thermochromic powder and blend it into a small amount of Part A (resin component) before the hardener is added. Use a ratio of approximately 1 part powder to 5–10 parts resin by weight for this initial dispersion paste. Stir by hand or with a low-speed spatula — not a power mixer. The goal is full wetting of every particle without shear. This pre-dispersion step is critical. It eliminates dry agglomerates before they become locked into a curing matrix.
Step 2 — Add the hardener. Once the powder is fully wetted into Part A, add Part B (hardener) according to the manufacturer's specified mix ratio. Stir gently but thoroughly — scrape the sides and bottom of the container. Aim for 3–5 minutes of hand-mixing. Avoid whipping air into the system; bubbles in a thermochromic pour are visually distracting and harder to remove post-mixing.
Step 3 — Degas if possible. A brief vacuum degas cycle (1–3 minutes under vacuum) removes entrained air without adding thermal stress. If a vacuum chamber isn't available, a heat gun passed quickly over the surface after pouring handles most surface bubbles, though deep voids won't be reached.
Step 4 — Pour in thin layers. Keep individual pour thickness under 6mm for standard casting resins. Thick pours concentrate exotherm heat. If the project requires depth, do multiple thin pours with full cure intervals between layers.
Loading Ratios and What Actually Happens at Each Level
There's no universal correct ratio — it depends on the color depth you want, the layer thickness, and whether you're relying on a background color for contrast. That said, these are practical starting points:
| Loading Level |
% by Weight (Powder/Total Mix) |
Visual Result |
Notes |
| Light |
2–4% |
Subtle tint; translucency retained |
Works well over colored base layers; reveal effect is prominent |
| Standard |
5–8% |
Solid, saturated color; moderate opacity |
Most versatile range for standalone pours |
| Heavy |
10–15% |
Dense, opaque color in ambient state |
Viscosity rises noticeably; dispersion becomes harder; diminishing returns above ~12% |
In practice, most epoxy art applications land between 5–8%. Below that, the color-change effect can appear washed out. Above 12%, the paste becomes difficult to fully degas and the risk of undispersed agglomerates increases sharply.
Thermochromic powders can be layered with other pigments — pearlescents and metallic powders are common combinations. If you're blending, add the thermochromic component last, and keep total pigment loading within the resin manufacturer's recommended ceiling (usually 20–25% combined).
Cure Conditions and Temperature Management
Room-temperature cure is always preferred over heat-assisted cure for thermochromic resin systems. If the resin manufacturer specifies a post-cure at elevated temperature to achieve full mechanical properties, keep the temperature as close to the minimum effective value as possible — ideally below 60°C — and monitor the cycle duration.
Avoid placing freshly poured thermochromic resin in a warm room or near a heat source to accelerate cure. It doesn't help the cure meaningfully and raises the risk of localized exotherm compounding. A stable 20–25°C environment with good airflow is the target.
One failure mode that gets overlooked: casting a thermochromic resin piece in a thick silicone mold with poor thermal conductivity. The mold traps heat during exotherm. On thin pours this rarely matters, but on pieces over 10mm thick, internal temperatures can surprise you. Aluminum molds or open forms dissipate heat far more effectively.
Working With Thermal Powder for Epoxy — Common Failure Modes
Understanding why thermal powder for epoxy applications fail is more useful than a checklist of dos and don'ts.
Loss of activation after curing. The piece looks normal but won't change color. Cause: exotherm exceeded capsule heat tolerance during cure, or the hardener system chemically attacked capsule shells. Prevention: lower pour thickness, use low-exotherm resin, avoid high-amine-content hardeners.
Spotty or uneven color change. Some areas activate; others don't. Cause: dry agglomerates that didn't get fully wetted during pre-dispersion. The powder is present but not suspended — it's sitting in clumped pockets. Prevention: always pre-disperse in Part A before adding the hardener.
Sluggish activation response. The color change happens, but it's slow and incomplete. Cause: loading ratio too low for the layer thickness, or the chosen activation temperature is too far from the operating environment. Reconsider pigment selection — a 31°C trigger in a space that sits at 28°C year-round will cause near-constant activation and make the piece look "stuck" mid-change.
Gradual fading of the effect over months. This usually indicates moisture ingress or UV degradation of the microcapsule polymer shell. Sealing the finished piece with a UV-resistant clear topcoat extends service life significantly in ambient-light environments.
Application Examples Worth Considering
Epoxy floor coatings with thermochromic pigment: thermochromic layers are typically applied as a mid-coat between a tinted base and a clear topcoat. The base color becomes visible when heat is applied (foot traffic, radiant heat), then returns to the thermochromic color as the surface cools. The activation temperature must be calibrated carefully — floor surfaces in sun-exposed areas can regularly exceed 35°C, which would keep a 31°C pigment permanently activated.
Craft art and resin casting: the most forgiving environment for these pigments. Thin pours, ambient cure, hand-contact activation. A piece cast with KTP-31-JB (black-to-colorless at 31°C) over a white or metallic base layer will appear fully opaque black at room temperature and reveal the base completely on touch — a dramatic, clean effect with minimal formulation complexity.
Functional temperature indicators: a high-trigger pigment like KTP-45-BR embedded in an epoxy-coated surface can serve as a crude heat indicator — color change signals that a surface has reached a meaningful temperature threshold. This is a legitimate functional use, though it's not a precision instrument.
FAQ
Can I use thermochromic powder with UV-cure epoxy resins?
Yes, with caveats. UV-cure systems typically generate less sustained heat than thermally cured epoxies, which is favorable. The concern is UV exposure during cure — extended or high-intensity UV irradiation can degrade microcapsule shells in some formulations. Run a short test cure before committing to a full batch. If activation response degrades post-cure, reduce UV exposure time or intensity.
Can I mix different activation temperatures into one pour?
Technically yes. In practice, it creates a multi-stage color-change effect where different pigments activate at different temperatures. The visual output is complex and often muddy unless the colors are carefully chosen to be complementary at each stage. It's more effective to use this approach in layered pours rather than a single blended pour.
Will thermochromic pigment affect the mechanical properties of cured epoxy?
At typical loading levels (5–10%), the effect on tensile strength, hardness, or flexibility is minimal and generally within the normal variation for pigment-loaded epoxy. At very high loadings (15%+), there can be a slight reduction in clarity and some impact on surface hardness, but this is rarely a functional concern in decorative or art applications.
Does the color-change effect degrade permanently after repeated activation cycles?
The leuco dye system is designed for thousands of reversible activation cycles under normal use conditions. Degradation is primarily driven by UV exposure, aggressive chemicals, or sustained extreme temperatures — not by the activation cycle itself. A well-sealed resin piece in indoor use should maintain performance for years.
For specific product selection, formulation parameters, or samples of thermochromic powders for resin testing, contact the Kolortek technical team directly at contact@kolortek.com.

 English
 Français
 Deutsch
 Русский
 Español
 Português